

Creating a Dynamic Malware Lab
About the setup
This blog covers the creation of a self-hosted malware lab, using technologies like Kasm and Proxmox.
I have used Kasm for quite some time now and I have to admit I really enjoy the idea of having my docker containers on the go, easily accessible and automated, and no, they are not paying me to say this unfortunately :(. But, there was an issue, Kasm only managed docker containers, which meant I was very limited in what I can do. Unable to run non-persistent Windows VMs. Sure, I could connect to Windows machines via RDP, but I still had to manually delete and restore the VM each time I would decide to go crazy and deploy malware. This was fixed on 20th of April 2026, when Kasm announced a partnership with Proxmox, although this setup would have worked before, I did not know about it until the partnership announcement. Allowing for management of Proxmox VMs and solving my issue (laziness). It streamlined the entire process, and, as soon as I heard about it, I decided to give it a go and finally complete the setup, and have my own self hosted malware lab, on the GO!
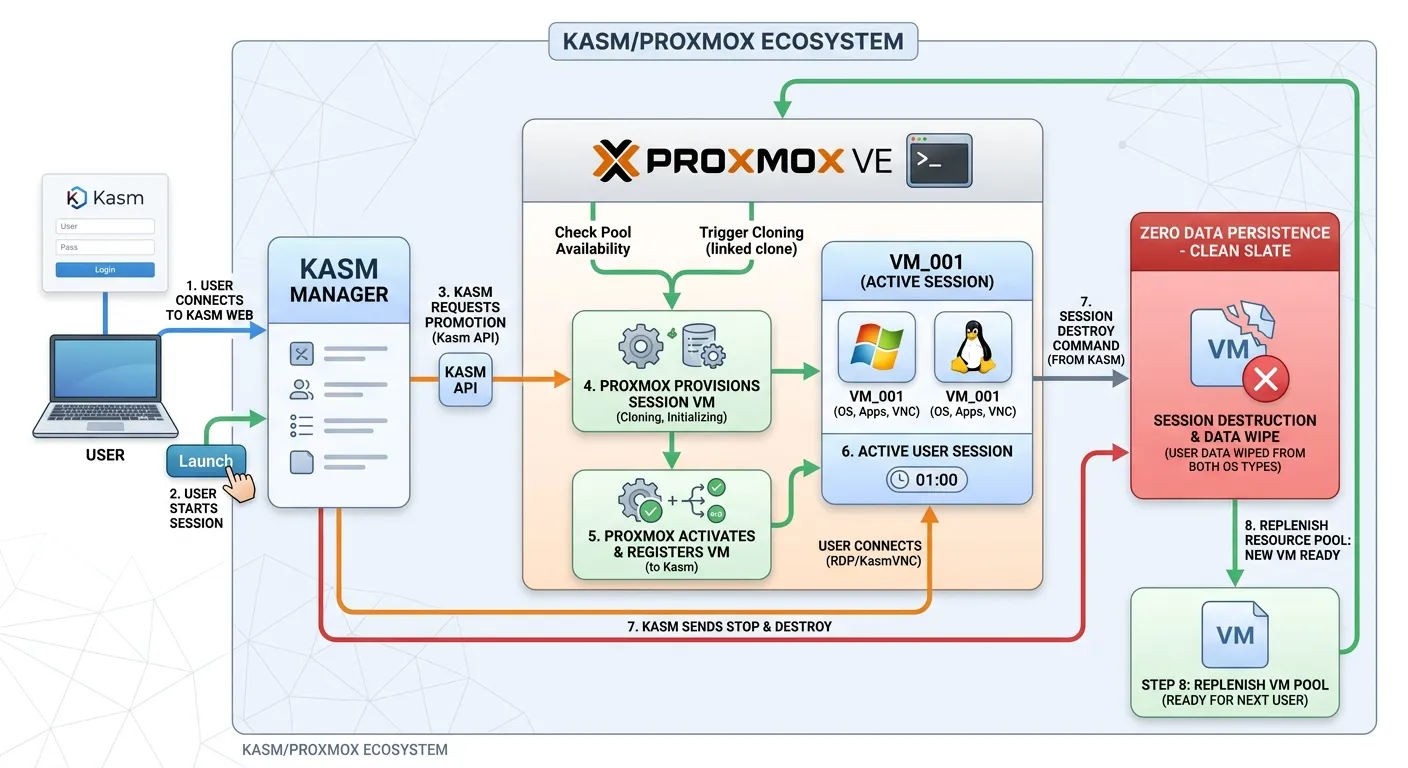
For this setup I have used an old laptop I had lying about, to host my Kasm setup, and a Dell Optiplex 3080 Micro. I recommend using something light, but with a bit of a kick to it. My laptop has an Intel I7 10th gen CPU with 8gb of RAM, and the Optiplex has an Intel I5 10th gen, and 24gb of RAM, enough to host the entire setup.
This blog will not cover the extensive setup of Kasm or Proxmox, only the the malware lab itself rather than the two underlying platforms. As a result, some prior knowledge or a bit of self-directed troubleshooting will be required.
Installing Kasm is rather easy, I opted for a bare-metal install… but you can easily run it in a VM on whatever device you may have available, the minimum requirements can be found HERE.
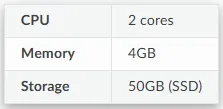
I wouldn’t recommend sticking to the minimum requirements, although it would suffice if you plan to run all the virtualization within Proxmox without Kasm host containers.
For the actual installation, documentation can be found HERE. On your Linux host simply run:
cd /tmp
curl -O https://kasm-static-content.s3.amazonaws.com/kasm_release_1.17.0.7f020d.tar.gz
tar -xf kasm_release_1.17.0.7f020d.tar.gz
sudo bash kasm_release/install.sh
Kasm requires a swap partition on the Linux host, if you haven’t created one before, simply run the last command with the following arguments, select your own preferred size:
sudo bash kasm_release/install.sh --accept-eula --swap-size 8192CRITICAL
Once the installation script completes, ensure you save the default Kasm credentials as you will need these for access, if you lose them, it’s a pain to re-gain access, I have done it a couple of times, and I have questioned my life choices every time.
Well done! Kasm should now be installed, play around and see what you can find, their documentation is quite extensive, so for any issues, visit their website
Once this has been installed, I recommend setting up a Cloudflare tunnel to expose it publicly via your custom domain, simply because it is cheap/free and you do not need to worry about the SSL certificates or having your network exposed.
Now, let’s move to the Proxmox installation!
Simply visit their website, download the latest ISO image, boot via USB or CD (CD… Looool). Bonus points if you are using Ventoy (legends know).
Now to the fun part, connecting Kasm and Proxmox together. Quick advice, ensure the network connection is there, either by having the two running on the same subnet or ensuring no firewall rules are blocking the connection, I would also recommend static IP configuration for the 2 hosts.
As before, Kasm covers the entire setup within their docs HERE so I will not go into extensive detail.
Proxmox Environment Setup
1. Create a new Proxmox Pool
In your Proxmox dashboard, go to “Permissions” -> “Pools” -> “Create” to create a new kasm-autoscale pool.
2. Create a new Proxmox User
Go to “Permissions” -> “Users” -> “Add” to create a new user. You don’t have to create a new account for autoscaling but we strongly recommend it.
3. Create an API token
Go to “Permissions” -> “API Tokens” -> “Add” to create a new Proxmox API token to use with Kasm. If you’re using an existing Proxmox account, we recommend you leave “Privilege Separation” enabled. If you’re using a dedicated Proxmox account, you can disable “Privilege Separation”. Make sure you save your generated Token ID and Secret securely as you cannot see them again.
4. Create a new role
To create a Role, go to “Permissions” -> “Roles” -> “Create”. You need the following privileges for Kasm autoscaling to function properly:
Following the setup in the above, it will ask you assing a new role for the autoscale config, if you are running Proxmox 9.2.1, some permission names have changed, which can cause issues. Luckily, I’ve got you covered. Assign the following roles:
VM.Config.Network, VM.PowerMgmt, VM.Migrate, VM.Console, VM.Config.Memory, VM.Config.HWType, VM.Config.CDROM, Datastore.AllocateSpace, VM.Config.Disk, VM.GuestAgent.FileRead, VM.GuestAgent.Audit, VM.GuestAgent.FileSystemMgmt, SDN.Use, VM.GuestAgent.FileWrite, VM.Audit, VM.Replicate, Sys.Audit, Pool.Audit, VM.GuestAgent.Unrestricted, VM.Config.CPU, VM.Clone, VM.Snapshot, Datastore.Audit, VM.Allocate, VM.Config.Options5. Assign Permissions to the New User
Finally, assign appropriate permissions to your user by going to “Permissions” -> “Add” -> “User Permission”. Select the appropriate user and role, and assign the following permissions
- /sdn/zones/<networkzone>
- /storage/<storagepool>
- /pool/KasmPool
6. Create a VM template
For the VM template you have two options, follow the instructions for each:
Linux VM template.
Windows Template.
Kasm environment Setup
Very important requirement, we want to make sure the deployment zone in Kasm is correct, the default value is “proxy”, we do not want that.
Go to Infrastructure > Deployment Zones - Edit the “Upstream Auth Address” and add the IP address of your Kasm host such as 192.168.1.10 (set your own IP) then click Save.
Now let’s setup the autoscale config.
1. Create a new Pool.
Infrastructure > Pools > Add Pool.
Select a pool name, for the pool type select “Server” as the docker agent is a completely different setup using docker containers, which I will not be covering in this blog, but there are plenty resources out there, including this cool video from Kasm. If your plan is to use Virtual Machines, either Linux or Windows and have direct full OS access, then server is the way to go.
2. Create a new Autoscale configuration.
Infrastructure > Pools > All AutoScale Configs > Add Autoscale Configuration.
Make sure it is enabled, give it a cool name, for the Autoscale Type select “server” again.
For Pool select the newly created pool and set the deployment zone to “default”.
Downscale Backoff is set to 60 seconds for me, your choice here.
Enable both Require Server Checkin and Kasm Desktop Service installed and for Connection type it should be RDP (port 3389) for Windows and KasmVNC (port 8443) for Linux.
Connection Credential type: set this according to your auth method (dynamic/LAPS or static).
The next settings are quite important, setting up the Minimum available sessions to 1 will allow Kasm to have a pre-provision a VM at all times, so you will always have a VM waiting for you, setting this to 0 mean you have to wait for the provision during the session creation, which adds an additional 3-5 minutes depending on your host. Up to you how many simultaneous sessions per server, mine is all set to 1, and expiration day to 1, as I want unused machines to be re-deployed after 1 day. The pre warm rotated server replacement, set this to 5, allowing Kasm a 5 minute headstart from the scheduled deletion of one server to creating a new one, essentially “warming” the next server up before the planned destruction of previous one.
3. Add VM Provide Configs.
From the AutoScale Config, click Next, OR:
Infrastructure > Pools > All VM Provider Configs > Add.
Choose a config name.
Provider should be “Proxmox”.
Choose another cool name.
Max instances, up to you, mine is 2.
For Host add the Proxmox host IP address followed by the port, the port number is the management port number for the Proxmox instance which should be 8006 example: 192.168.1.11:8006 (choose your own IP)
Username, type in the username you created in Proxmox for the autoscale setup including the @pve.
Token name, this is the token name you have given in the Proxmox during token creation.
Token Value, this is the value fo the API key you have created during Proxmox setup.
Verify SSL, disabled most likely, unless you have SSL certificates setup (fancy).
The VMID range lower and upper should be what you want the range to be, this is for the dynamic VMs, make sure it does not clash with anything existing in Proxmox, select something like 1000 - 2000 or whatever you want really, I am not your boss.
Full-clone, leave it disabled unless you prefer longer deployment time.
Cores and Memory, up to your availability, go wild if you can.
Select the OS type depending on what you are running, and for the script path, select a path, I usually select a temp directory.
Startup script, there is a full github page for it from Kasm, available HERE, and I will admit I have used Claude AI for this, as I am lazy and quite frankly, I was very tired by this step, but for simplicity I can provide my startup script for Windows VMs, because I am chill like that.
$Version = '1.19.0'
$StartupScriptArchive = 'kasm-windows-startup.zip'
$StartupScriptUrl = 'https://kasmweb-build-artifacts.s3.amazonaws.com/kasm-autoscale-scripts/' + $Version + '/' + $StartupScriptArchive
$WorkingDirectory = $Env:Temp
$ArchivePath = Join-Path $WorkingDirectory $StartupScriptArchive
$InitScript = Join-Path $WorkingDirectory 'Init-VM-Task.ps1'
$ProgressPreference = 'SilentlyContinue'

Write-Output 'Initiating Kasm Startup Script'
Write-Output 'Downloading startup script archive'
Invoke-WebRequest -Uri $StartupScriptUrl -OutFile $ArchivePath

Write-Output 'Extracting startup script archive'
Expand-Archive -Path $ArchivePath -DestinationPath $WorkingDirectory -Force

Write-Output 'Executing Init-VM-Task.ps1'
& $InitScript -KasmHostname '{upstream_auth_address}' -RegistrationToken '{checkin_jwt}' -ServerId '{server_id}' -KeepTaskActionScripts
The above script should work, and if not, feed it into Claude and ask why it works for me and not for you.
Kasm Workspace Setup
Now for the final step: creating the user-facing Workspace for your new VM pool.
- Go to Admin -> Workspaces -> Add Workspace.
- Set Workspace Type to Pool.
- Add a friendly name and description.
- Scroll down to Pool Options and select your newly created Kasm Pool.
- Click Save.
Wrapping Up
At this point, the setup should be complete, click Save/Submit, and get ready to play.
Head over to the Workspaces dashboard, and you should have your new workstation available, and ready to start a session. For any issues or anything I may have missed, please ensure you follow the documentation and maybe watch the video available HERE.
Security Reminder
- VPN: I strongly recommend routing your traffic through a secure VPN service, you know, to be extra sneaky.
- Network Isolation: Double-check your Proxmox firewall and VLAN rules! Ensure outbound connections from your malware VMs are strictly blocked so that when things inevitably go wrong during testing (which they will), your entire home network isn’t affected, and you don’t end up getting your Grandma ransomwared… unless that’s your thing, no judgment here.
So by this point you may ask… But WHYYY.
Well because… Why not! That’s why.
This architecture gives you a privately owned, fully customizable malware lab running full Windows VMs (hopefully loaded up with FLARE VM). You can securely connect from anywhere in the world, execute a sample, analyze the output, and hit Delete. Kasm and Proxmox wipe the slate clean, instantly destroying all traces of the malware and leaving a fresh VM primed and ready for your next test.
Happy detonating!